

Working on additions and alterations can be challenging. After measuring up an existing building, you need to accurately model what’s there and clearly show the proposed changes. Many users struggle with getting drawings to display correctly, and this is where Phasing becomes essential. Phases in Revit allow you to distinguish between existing elements, new additions, and demolished elements. With the right setup, your drawings will communicate changes clearly to consultants, clients and the local planning authority.
The Phasing tool can be accessed in two main places. On the Manage tab, towards the right-hand side, you’ll find the Phases button. This dialog box is where you define your Project Phases, such as “Existing,” “Demolition,” or “New Construction.” Within the same dialog, you can control Phase Filters, which determine how elements are displayed in each phase, and you can also set up Graphic Overrides. For example, you might want existing elements to appear greyed out, demolished items to display with red dashed lines, and new elements to be shown in bold black. Using the correct line weights, style and colour will make your drawings more legible.


The second place you’ll encounter phasing is in the Properties Browser. Here you’ll find the ‘Phases’ and ‘Phase Filter’ settings, which control how elements are displayed in the current view. By default, new projects are set to “New Construction,” so it’s important to change this setting if you’re working with existing projects. When you select an element, you’ll also see different properties where you can define the ‘Phase Created’ and the ‘Phase Demolished’. This is crucial when compiling your drawing sets at a later stage. By setting this up correctly, you save yourself and your team time in the future.
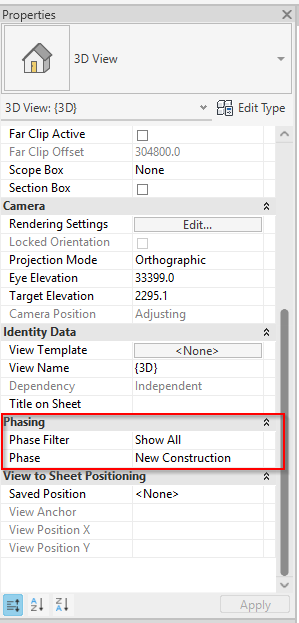
The way elements appear on your drawings ultimately depends on the phase filter applied to the view. For example, an element marked as existing might appear grey, a demolished wall might display as a red dashed line, and a newly created component will appear in its normal line weight. By controlling these settings, you can quickly generate clear and accurate drawings that show the progression from the existing building to the final proposed alterations.
Phasing is more than just a graphic tool — it’s about communication. With a proper setup, contractors can easily identify what needs to stay, what should be removed, and what is being built anew. Compiling council approval and construction documentation drawing sets becomes easier if phases and filters are set correctly. And within your team, a well-phased model makes collaboration much easier, as colleagues can immediately understand which work belongs to which stage of the project.

