
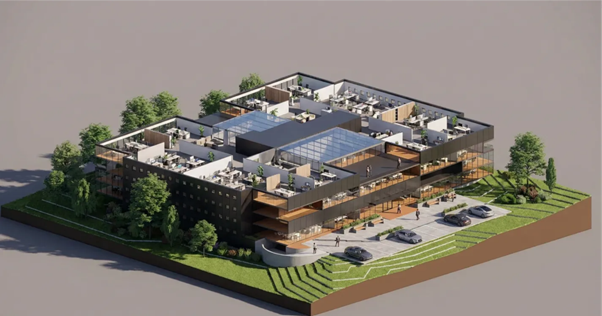
From early site design to detailed BIM
Every architectural project starts somewhere.
Sometimes that starting point is a survey, sometimes a CAD drawing, and increasingly, it is a digital representation of the real-world site.
Before we begin modelling walls, floors, roofs and detailed building systems in Revit, there are important questions to answer:
Where is the project located?
What does the site look like?
What surrounds it?
What is the terrain doing?
And how does the proposed building respond to its context?
Autodesk Forma provides a powerful environment for exploring these questions during the early stages of design. With Forma Site Design and Forma Building Design, designers can investigate sites, create proposals and scenarios, study context and explore design possibilities before committing to detailed BIM development.
The challenge has traditionally been moving that information into Revit.
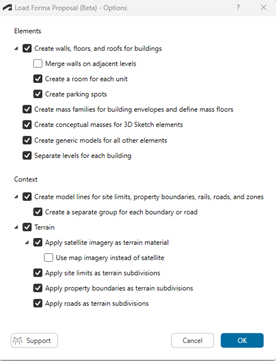
Revit 2024, 2025 & 2026 already provided a useful connection between Forma and Revit through the Load Proposal workflow, allowing Forma proposals and contextual information to be brought into a Revit project.

Revit 2027 takes the concept considerably further.
With Revit becoming the first Forma Connected Client, the relationship between Forma and Revit is moving away from a simple import/export workflow and towards a connected design environment. Instead of thinking only in terms of transferring files, designers can connect a Revit cloud model to a Forma Scenario, reference design information and enrich the Revit model with real-world contextual data.
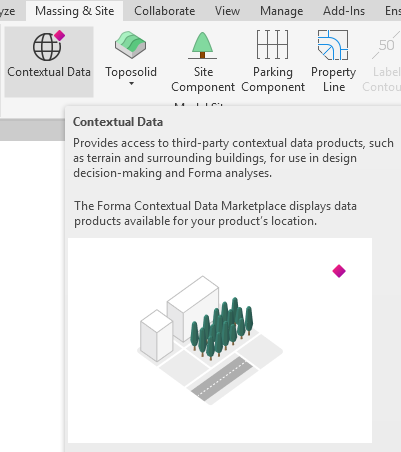
In this article, we will walk through the complete workflow, from creating the Forma project and preparing Forma Data Management, through to creating a new Revit 2027 project, saving it as a non-workshared Cloud Model, connecting it to a Forma Scenario and bringing contextual site information such as terrain into Revit.
The focus is deliberately practical.
The goal is not to create a complicated BIM collaboration environment. The goal is much simpler:
Get the site into Revit so that we can design the building in the correct context.
Before we begin: Cloud Model or Cloud Worksharing?
This is an important distinction.
If you have worked with Autodesk Forma (previously known as Autodesk Construction Cloud, Autodesk Docs, BIM Collaborate Pro) or Revit Cloud Worksharing before, it is very easy to assume that putting a Revit model in the cloud automatically means that the model must be workshared.
It does not.
Autodesk provides Cloud Models for Revit, which allows a non-workshared Revit model to be saved to Autodesk cloud storage (Autodesk Forma). Autodesk documentation confirms that the Cloud Models for Revit entitlement is included with Revit standalone and the AEC Collection. A separate Revit Cloud Worksharing entitlement is required when you want multiple users to simultaneously work in a workshared cloud model. That entitlement is included with Forma Design Collaboration.
For the workflow demonstrated here, we are using:
Revit + Cloud Models for Revit + Forma Data Management
We are not creating a Revit Cloud Workshared model.
This makes the workflow particularly useful for an architect or designer who has Revit through the Autodesk AEC Collection or a standalone Revit subscription, but does not require Forma Desing Collaboration simply to get the project started in the cloud.
There is another practical advantage: a non-workshared Cloud Model can later be converted to a workshared cloud model if the project requirements change and the appropriate entitlement is available.
Part 1 — Preparing the Forma project
Step 1 — Create your Forma project
Before opening Revit, start by establishing the project within Forma Data Management.
Forma Data Management provides the cloud project environment where your project information, folders, permissions and Revit cloud model can be organized.
When creating the project, consider the project name, project number, location and other basic project information.
If your organisation already uses project templates, this is also a good opportunity to establish a standard folder structure rather than creating every project from scratch.
Autodesk supports creating projects from templates, allowing folder structures and associated permissions to be reused when creating new projects.
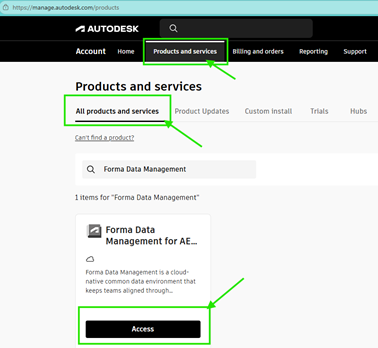
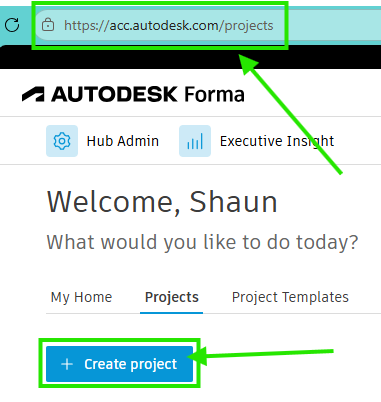
1. Go to Autodesk Forma Home Page
Depending on your region you can enter the URL or access Forma Data Management via your Autodesk Account > Products and Services > Forma Data Management > Access
2. Create project
3. Fill in Project Details
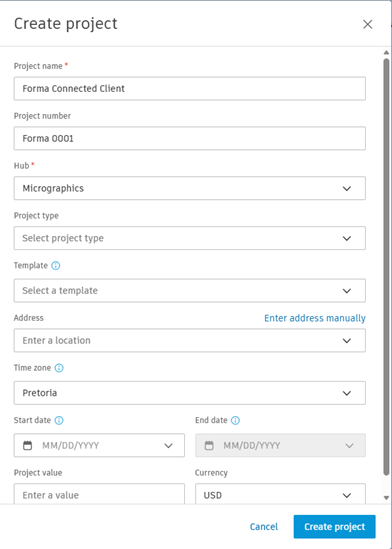
4. Click Create project
Once the project has been created, we can begin preparing its information structure.
Step 2 — Create the project folder structure
A cloud project should not simply become a digital dumping ground for files.
Even for a relatively small architectural project, it is worth establishing a logical structure from the beginning.
For example:
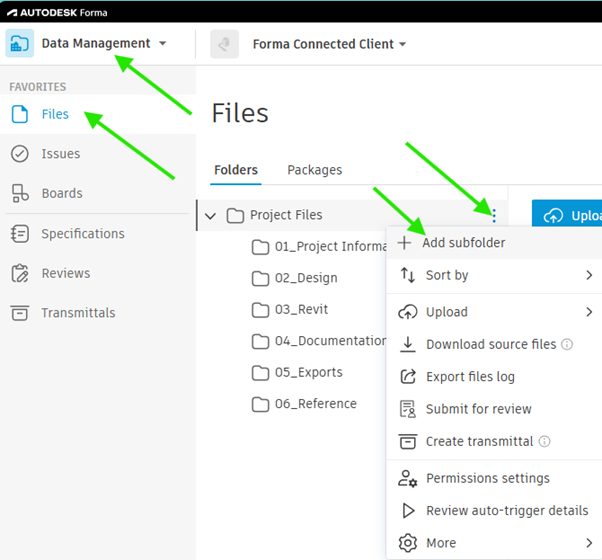
Project Files
→ 01_Project Information
→ 02_Design
→ 03_Revit
→ 04_Documentation
→ 05_Exports
→ 06_Reference
Your actual structure will depend on your company’s standards, but the principle remains the same.
Create the structure before the project becomes busy.
Forma Data Management allows project administrators to create folders and apply permissions at folder level. Autodesk also supports project templates that can carry folder structures and permissions into new projects.
Step 3 — Configure permissions
Creating folders is only half of the process.
The next question is:
Who should be able to access them?
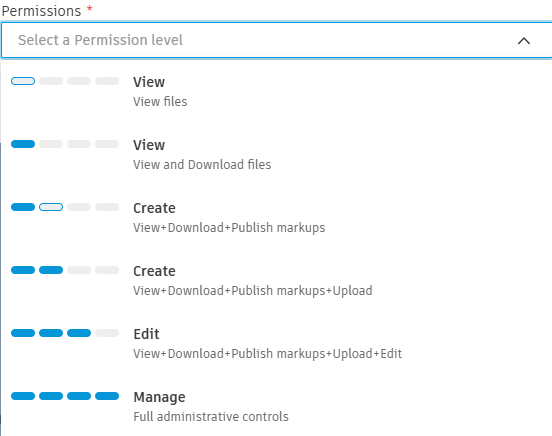
Forma Data Management provides several permission levels, ranging from View through to Manage. Permissions can be applied to users or, preferably in many organisational environments, to roles.
For example, you may decide that:
- Project administrators have Manage access.
- Architects have Edit access to design folders.
- Consultants have appropriate access to their required folders.
- General project members may only require View or View + Download access.
Remember that being a member of a Forma project does not automatically mean that the user has access to every project folder. Folder permissions still need to be configured appropriately.
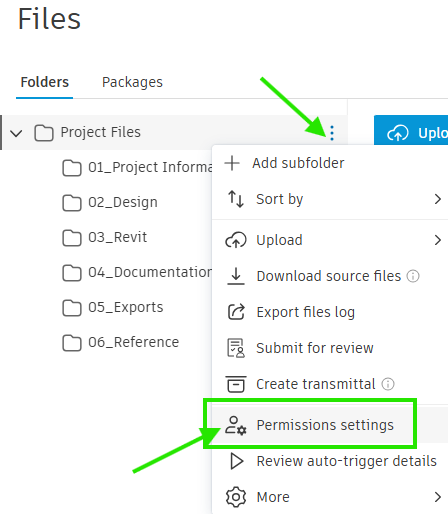
1. Click on the 3 dots next to the folder and select permission settings.
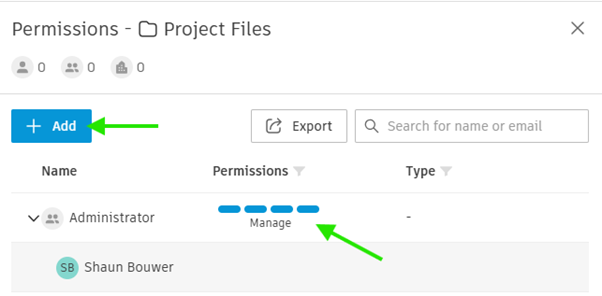
2. On the right-pane fly out menu (Permissions), add members (if required) and choose a permission level
This is one of those steps that is easy to overlook when setting up a project for the first time.
It is also one of the steps that can save considerable frustration later.
3. Select a Permission Level:
Part 2 — Creating the Revit project
Step 4 — Start a new Revit project
Now we can move into Revit.
Open Autodesk Revit 2027 and create a new project using any template e.g. Architectural Template.
For this example, we are deliberately starting with an empty Revit project – based on a default template.
Why?
Because we want Forma to establish the project context before we begin developing the detailed BIM model.
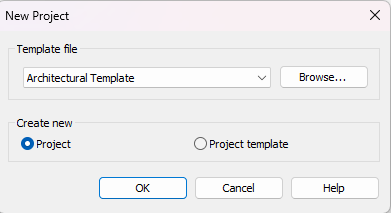
At this point, there is no building.
And that is exactly what we want.
We are going to establish the site first.
Step 5 — Save the Revit model as a Cloud Model
With the new project created, save it to the Forma Data Management project.
1. File → Save As → Cloud Model
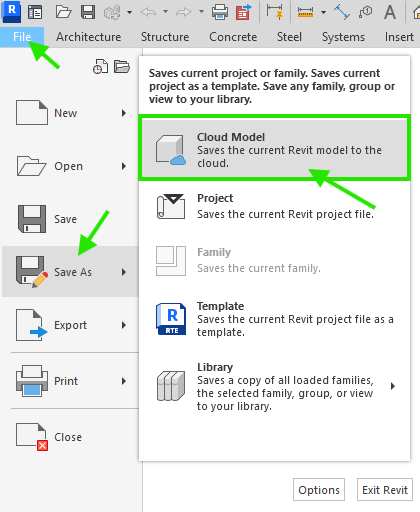
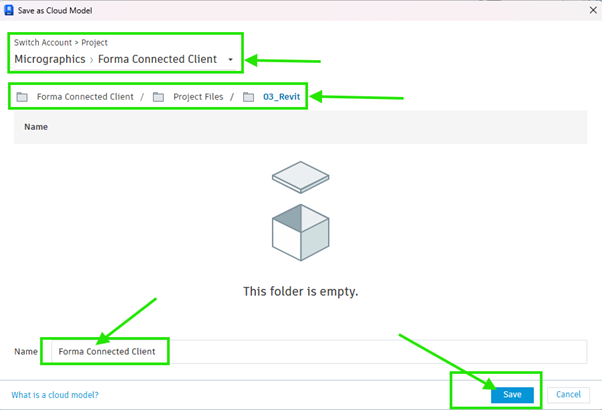
The Save as Cloud Model dialog allows you to navigate to the appropriate Forma project and folder.
Choose the appropriate location within the project’s Project Files area and save the model.
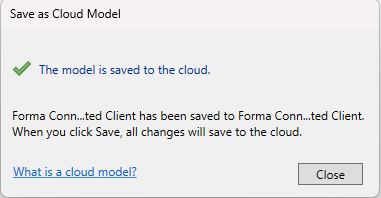
Autodesk’s Cloud Models workflow specifically supports saving a non-workshared local Revit model to a selected cloud project. Once saved, subsequent saves update the cloud model.
2. Select Account (Hub) from the Save as Cloud pop up dialog
3. Navigate to the Project
4. Select the destination subfolder where you want to save your Revit model (.rvt)
5. Input Revit Project Name and Save
A very important check
Make sure that you are actually saving a non-workshared Cloud Model.
If Collaboration/Worksharing has already been enabled in the model, Revit may attempt to use the Cloud Worksharing workflow instead. Autodesk identifies this as one of the common reasons users see messages requesting access to Revit Cloud Worksharing.
For this workflow:
No worksets.
No Synchronize with Central.
No Forma Design Collaboration requirement.
Just a Local Revit (.rvt) model saved to the Cloud. “Cloud Model”
Part 3 — Revit 2026: the earlier Forma workflow
Before we get into the new Revit 2027 workflow, it is worth briefly looking at what was available previously.
Revit 2026 provided a Load Proposal workflow through the Forma integration.
The general process was:
Forma proposal → Load Proposal → Revit
A new Revit project could be created, the Forma proposal could be loaded and selected Forma information could be converted into Revit elements.
This was already a significant improvement over manually rebuilding the site from Toposolid Sketch of from CAD import.
The workflow also supported georeferencing and contextual information, with the Forma location being used to establish the Revit project’s geographical context. Autodesk’s documentation describes the workflow as a way of creating a contextual, georeferenced model using Forma and Revit.
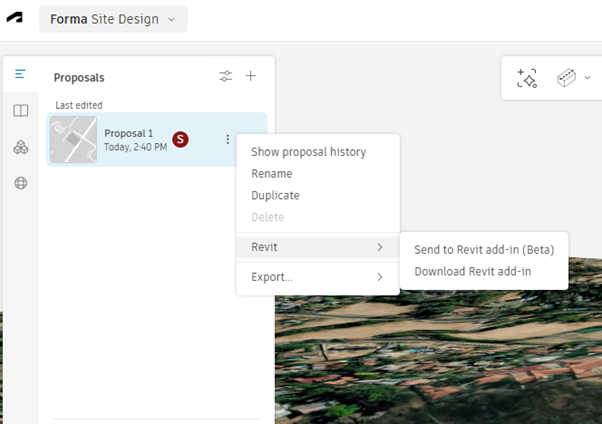
Forma Site Design (Web browser) – Select your proposal > Click on 3 dots > Revit > “Download Revit add-in”(if not done yet) and “Send to Revit”
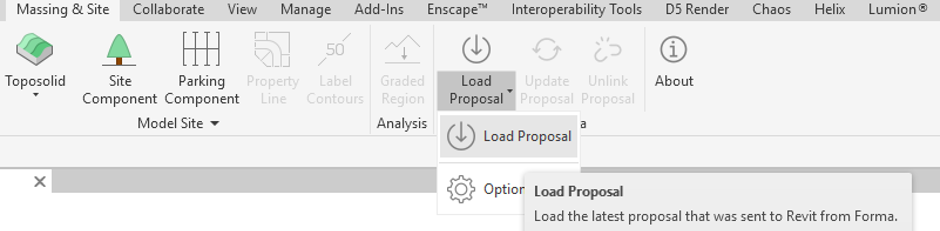
Revit > Massing and Site Tab > Forma Panel > Load Proposal
However, the workflow was still fundamentally based around the concept of loading a proposal into Revit.
Revit 2027 introduces a different idea:
Connect the Revit cloud model to a Forma Scenario.
And that is where things become much more interesting.
Part 4 — Revit 2027 becomes a Forma Connected Client
Step 6 — Connect Revit to Forma
Revit 2027 is the first Autodesk desktop application to become a Forma Connected Client.
The Connected Client approach is designed to connect Revit directly to the Forma industry cloud rather than relying entirely on traditional file-based import/export workflows.
Autodesk describes the initial workflows as allowing users to see shared data across applications, enrich Revit models with real-world contextual information, perform Forma analyses and move between Forma Site Design and Revit more seamlessly.
This is an important change in mindset.
Instead of:
“I created something in Forma. Now I need to export/import it into Revit.”
we can start thinking:
“My Revit model and my Forma design are connected through a shared scenario.”
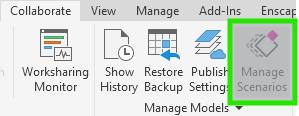
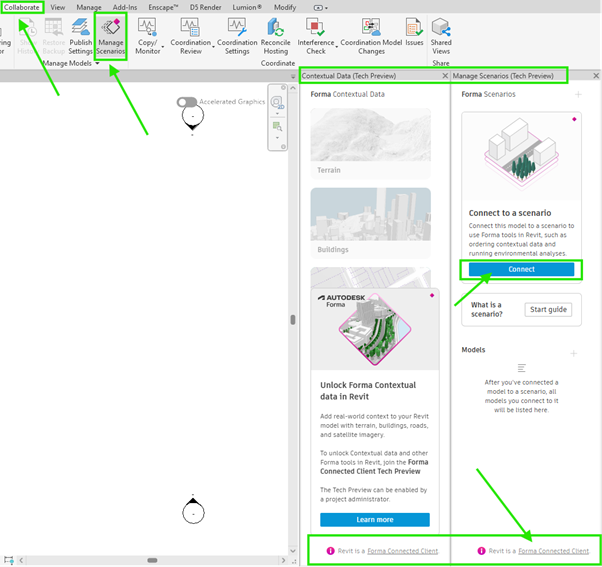
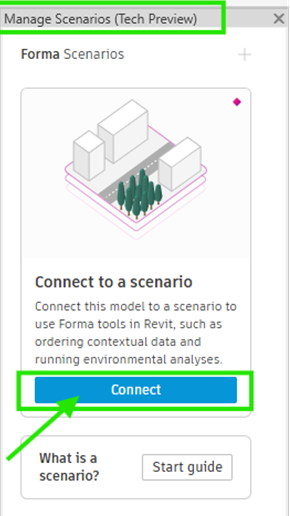
In Revit > Collaborate Tab > Manage Models Panel > Click Manage Scenarios
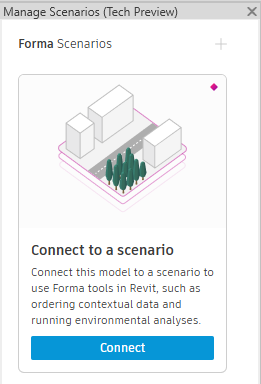
In the Manage Scenarios Pane (Pop up – can be docked) Click Connect
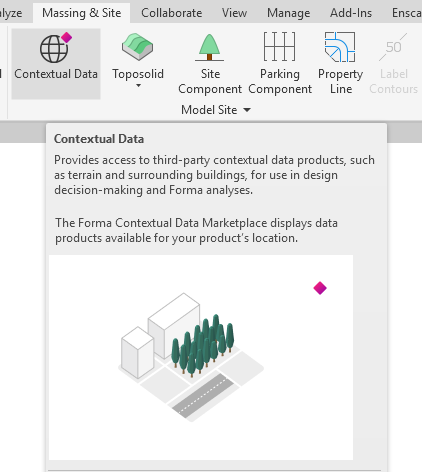
For the Contextual Data > Massing and Site Tab > Model site Panel > Select Contextual Data
To load contours, buildings and other contextual data into your Revit workspace.
Important: Technology Preview
There is an important disclaimer here.
The Forma Connected Client functionality in Revit 2027 is currently a Technology Preview.
Autodesk describes the functionality as fully usable for experimentation and learning, but still under development, and recommends that users do not rely on the Tech Preview features for production projects.
The Tech Preview also has regional availability requirements. Autodesk currently states that these capabilities are supported for projects stored in the United States, European Union and Australia data regions, with additional regions potentially being added over time.
This is therefore something to check before assuming that every Forma project will immediately expose the Connected Client functionality.
Part 5 — Connect the Revit Cloud Model to a Forma Scenario
Step 7 — Enable the Forma Connected Client experience
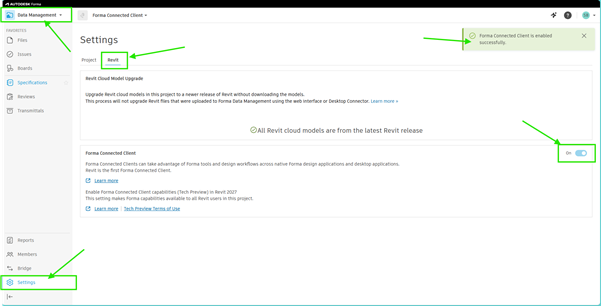
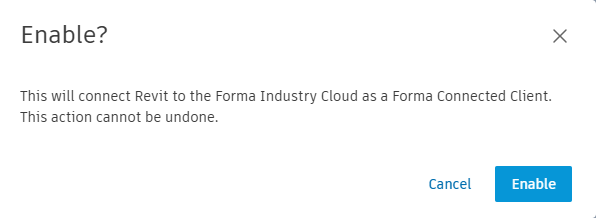
The project administrator must enable the Forma Connected Client Tech Preview for the relevant Forma project.
Once enabled, the Revit 2027 cloud models stored within that Forma project can participate in the connected workflows.
Autodesk notes that users should save and exit the project’s Revit cloud models before the project is added to the Tech Preview. After enabling it, Autodesk advises allowing up to approximately 30 minutes for the models to be processed for Forma workflows.
Web Browser > Forma > Your Project > Data Management Module > Settings > Revit Tab > Enable Forma Connected Client
This is another important difference from simply opening a Revit model and loading a Forma proposal.
The project itself becomes part of the connected Forma environment.
Step 8 — Work with Forma Scenarios
A Forma Scenario can be thought of as a shared design container.
Rather than keeping every design iteration isolated inside a particular application, scenarios provide a place where design models and contextual information can be referenced and coordinated.
Autodesk describes scenarios as a way of referencing and coordinating models regardless of where they were authored.
This is particularly useful when working between Forma Site Design, Forma Building Design and Revit.
For example, you may have:
Scenario 01 – Existing Conditions
Scenario 02 – Option A
Scenario 03 – Option B
Scenario 04 – Preferred Design
The exact naming convention is entirely up to your project workflow.
The important concept is that the scenario represents the connected design environment.
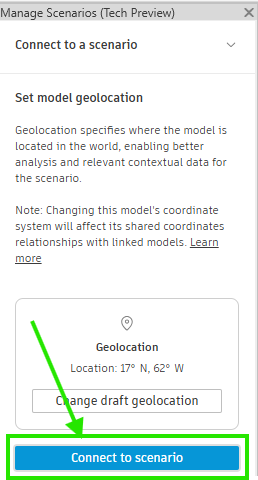
In Revit, once you selected Connect on the Manage Scenario Pop Up Dock-able Pane > Give your Site a name and Select Geolocation for your Site.
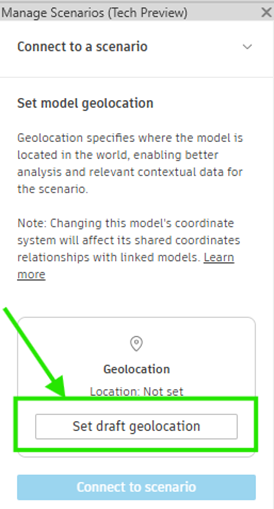
Find your Site on the Draft Geolocation Pop up dialog
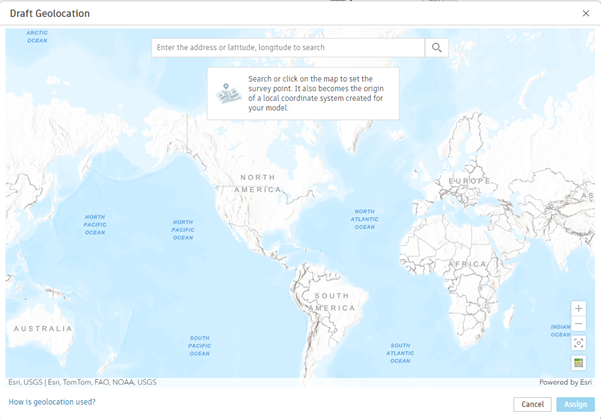
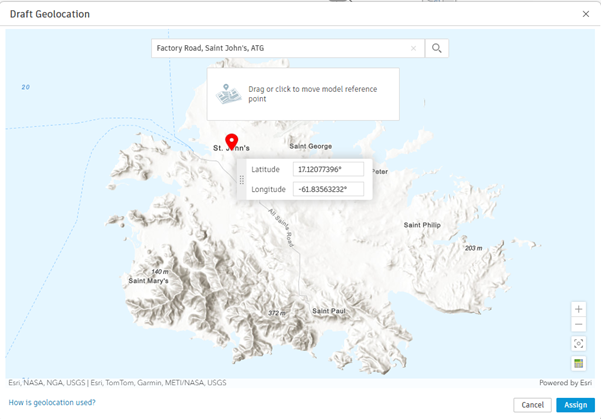
Once Assigned > Connect to scenario
Part 6 — Bringing the site into Revit
Step 9 — Establish the Revit model’s geolocation
For the Forma workflow to work correctly, the Revit model needs to be associated with a geographic location.
This is particularly important because the contextual information we want to bring into the model is not simply arbitrary geometry.
It represents a real location.
Terrain has an elevation.
Buildings have geographical positions.
Autodesk’s Revit 2027 Forma documentation specifically identifies geolocation as a requirement for Forma workflows.
This is one of the areas where the Connected Client approach becomes especially useful.
The site context and the Revit model are not being treated as unrelated drawings.
They share geographical context.
Part 7 — Add contextual data
Step 10 — Access Forma Contextual Data
Now we reach the part that is likely to be the most valuable to many architects:
The site.
Forma provides access to contextual information that can be used to understand the environment surrounding the project.
This can include information such as:
- Terrain
- Surrounding buildings
- Site context
- Other location-based datasets
Autodesk describes the Revit 2027 workflow as allowing users to acquire site data such as terrain and use it to provide context throughout the design process.
Revit 2027 also provides access to the Forma Data Marketplace through the Massing & Site environment, including workflows for ordering surrounding building data and converting that information into Revit-native site modelling elements.
Revit Ribbon > Massing & Site Tab > Model Site Panel > Contextual Data
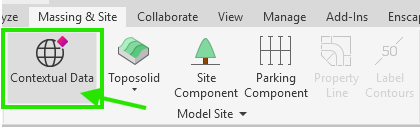
On the Contextual Data Pane > Click Order contextual data
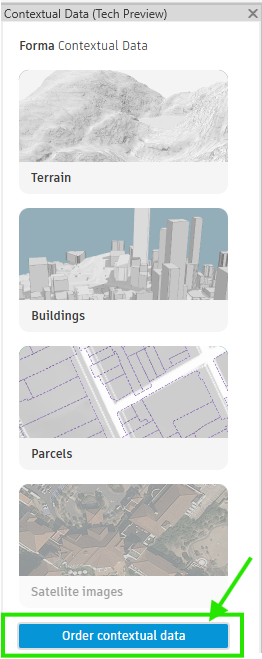
Select what you would like to bring into your Revit workspace:
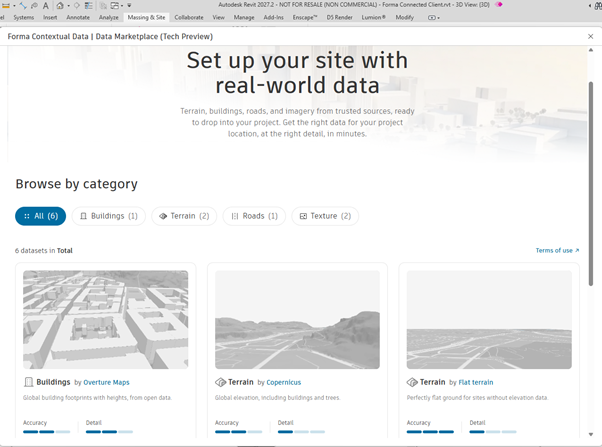
Example – Terrain:
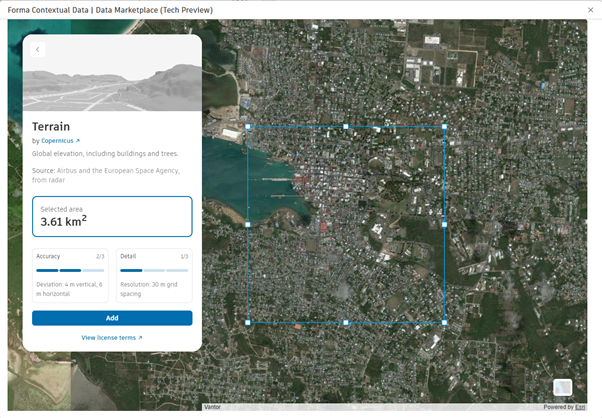
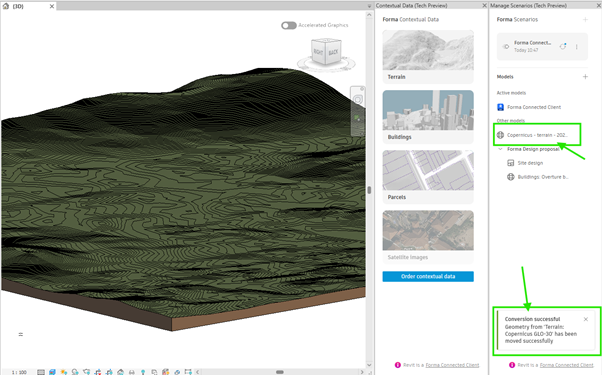
Step 11 — Bring the terrain into Revit
For our workflow, the terrain is the star of the show.
Having a Revit model sitting on a completely flat Level 0 is one thing.
Having that model positioned within the actual terrain of the project is something very different.
With contextual terrain available, the architectural model can begin to respond to:
- Existing ground levels
- Slopes
- Changes in elevation
- Site relationships
- Surrounding buildings
- Real-world context
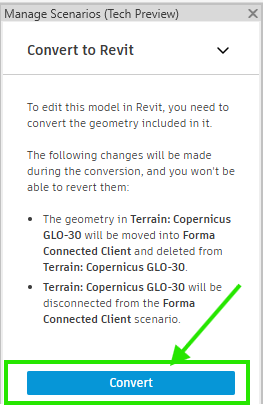
Convert to Revit > The Toposurface from Forma to Revit Toposolid – Usable topography with layers
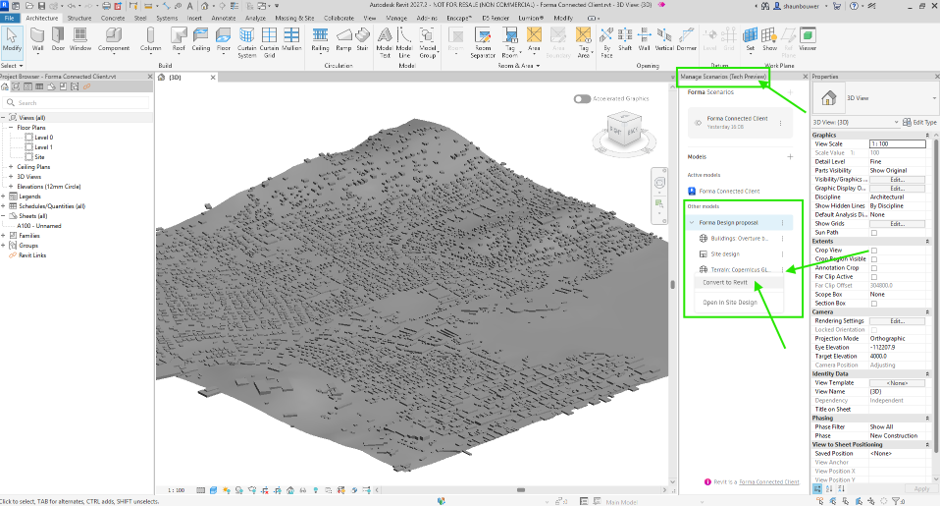
This immediately changes the way we can begin developing the project.
Instead of designing the building and worrying about the site later, the site becomes part of the design environment from the beginning.
Optional – Repeat for more contextual data:
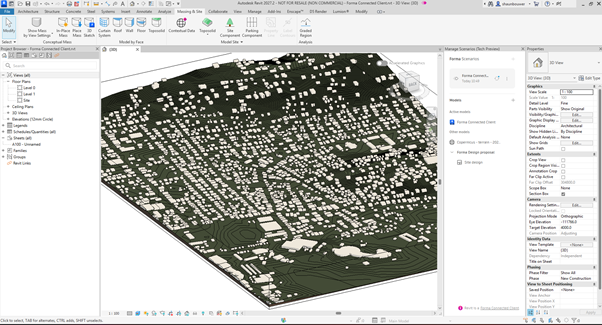
Part 8 — Develop the building in Revit
Step 12 — Start modelling
And now, finally, we can start building.
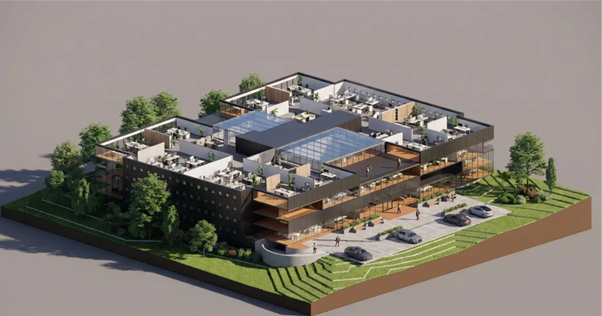
The Revit model can now become the detailed BIM representation of the project while the site and contextual information provide the real-world foundation around it.
This is where the distinction between Forma and Revit becomes important.
Forma is exceptionally useful for early-stage exploration, site design, contextual understanding and design analysis.
Revit is where we develop the detailed BIM model.
The goal is therefore not to make one application replace the other.
The goal is to allow the two environments to work together.
What about sending the design back to Forma?
This is an important question, particularly for users who have previously worked with the Revit 2026 Forma workflow.
The new Connected Client approach is designed around connected scenarios rather than simply repeatedly exporting and importing files.
Web Browser > Forma Site Design > Revit and Forma Connected, available in Both Revit and Forma, for bidirectional synchronization > To do further analysis and design.
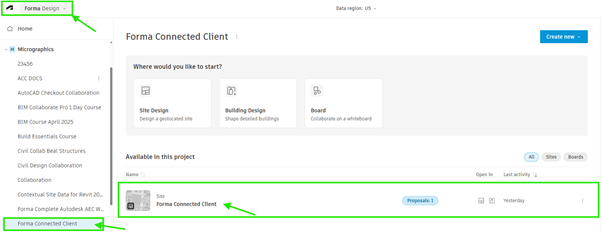
The underlying principle is that the scenario can contain references to design information regardless of where that information was authored.
That means the relationship is increasingly becoming:
Forma ↔ Scenario ↔ Revit
rather than simply:
Forma → Export → Revit
Autodesk describes this as a connected environment where models, data and context can be shared across Forma applications and connected desktop products.
There are still limitations and the Connected Client functionality is evolving, so it is important to treat this as a connected design workflow rather than assuming that every Revit element will behave like a fully bidirectional live-sync object.
The important improvement is that the scenario becomes the common point of connection.

Final thoughts
The journey from early concept to detailed BIM does not have to be a series of disconnected applications and file transfers.
With Forma Site Design and Forma Building Design, designers can explore the site and develop early design scenarios.
With Forma Data Management, the project can be organised in a controlled cloud environment with structured folders and permissions.
With Revit 2027 as a Forma Connected Client, the Revit model can become part of that connected environment, allowing scenarios and contextual information to flow into the detailed design workflow.
And perhaps the most useful part of all is the simplest:
The building can finally be designed on the site it is going to occupy.
For users with Revit or the Autodesk AEC Collection, this workflow also demonstrates an important distinction: you do not necessarily need Forma Design Collaboration simply to place a non-workshared Revit model in the cloud and establish this connected project foundation.
Cloud Models for Revit provides the entitlement for non-workshared cloud models, while Revit Cloud Worksharing is a separate workflow requiring the appropriate entitlement.
As Autodesk continues developing the Forma Connected Client, the boundary between early-stage site exploration, contextual analysis and detailed BIM development will continue to become less about moving files between applications and more about maintaining a connected flow of information.
For architects and BIM professionals, that is potentially the more significant change.
Not simply moving from Forma to Revit — but designing with Forma and Revit as connected parts of the same workflow.
Autodesk resources
For readers wanting to explore the technology further, Autodesk provides detailed documentation covering the Forma Connected Client, Forma Scenarios, contextual data, Cloud Models and Revit’s Forma workflows.
- Autodesk Revit 2027 – Forma Connected Client
- Autodesk Revit 2027 – [UPDATED] Revit Becomes a Forma Connected Client: Bridging Cloud and Desktop with the Forma Industry Cloud – AEC Tech Drop
Important: Because the Revit 2027 Forma Connected Client remains a Technology Preview, Autodesk’s current documentation and regional availability should be checked before implementing the workflow on production projects.

