
Introduction
Civil engineers and designers are constantly challenged to deliver projects faster, with higher accuracy and stronger collaboration across disciplines.
Autodesk Civil 3D bridges this gap by providing a dynamic, model-based design environment that integrates surveying, design, and documentation into one intelligent workflow.
In this blog we’ll explore:
- What Civil 3D is and who uses it?
- The Civil 3D Interface and Workspace.
- Core capabilities for practical design applications.
What is Civil 3D and who uses it?
Autodesk Civil 3D is a civil infrastructure design and documentation software that supports Building Information Modelling (BIM) processes. It helps professionals design and analyze infrastructure such as:
- Roads and highways
- Stormwater and sewer networks
- Platforms and grading
- Pipelines and drainage systems
- Land development and site projects
Civil 3D is used by:
- Civil Engineers, Technologies and Technicians – for roadway design, grading, and earthworks.
- Surveyors – for processing survey data and creating topographic surfaces.
- Urban Planners & Developers – for layout and design of site developments.
- Infrastructure Consultants – for drainage, utilities, and transportation systems
The Civil 3D Interface
When you open Civil 3D, the interface looks familiar to AutoCAD – but smarter. Civil 3D builds on AutoCAD’s drafting tools by adding civil-specific panels and contextual ribbons.

Key Interface Components:
Ribbon Tabs
The Ribbon is the main interface for accessing commands and features, organized into tabs such as Home, Insert, Modify, and Analyze. There are three basic types of ribbon tabs:
- Static Ribbon Tab– always displayed when the ribbon is turned on (e.g. Home, Insert, etc.)

- Contextual Ribbon Tab– Appear when an object or command is selected. (e.g. Surface or Alignment, etc.). Use the Launch Pad Panel in contextual ribbons to quickly access next-step commands (e.g., creating a corridor from an alignment).

- Multiple Object Ribbon Tab– Appear when selecting different object types simultaneously.

Geolocation Ribbon Tab: After assigning a coordinate system, the Geolocation ribbon tab is displayed in the ribbon, allowing integration with map data and real-world coordinates.
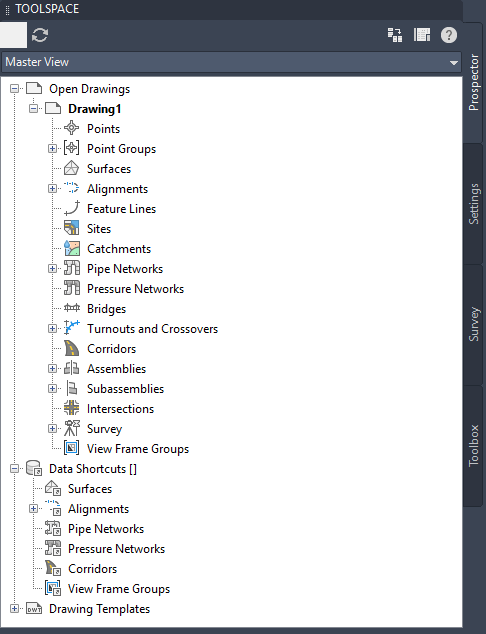
Toolspace Window
The Toolspace is the control center for Civil 3D Data. I t contains four essential tabs:
- Prospector – Access project objects (surfaces, alignments, pipe networks).
- Settings – Manage styles, labels, and templates.
- Survey – Work with field survey data.
- Toolbox – Access reports, utilities, and analysis tools.
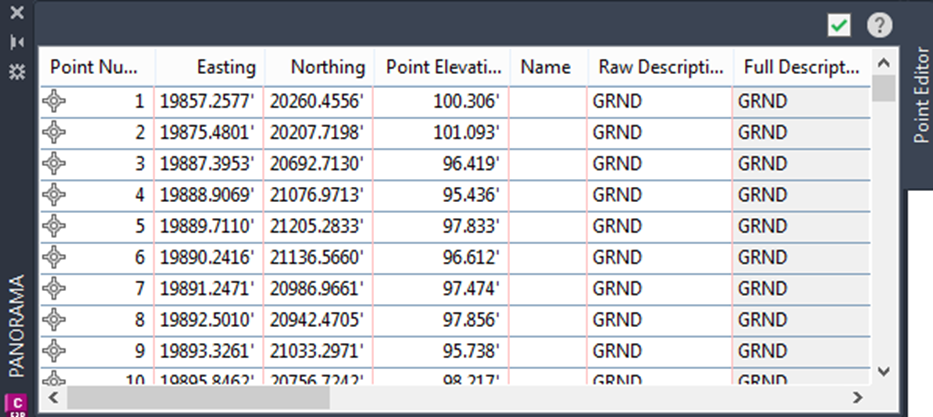
Panorama Window
The Panorama window displays tabular data, error messages and reports dynamically linked to your model. Data such as the Point Editor Vista and the Alignment Entities Vista.
Workspace in Autodesk Civil 3D
| WorkSpace | Description | Ideal For |
| Civil 3D | Displays design and survey tools for surfaces, alignments, and corridors. | Civil Engineers, Designers |
| Drafting & Annotation | Focused on 2D drawing and annotation tools. | Drafters, Documentation |
| 3D Modeling | Provides AutoCAD 3D modeling features. | Visualization, Modeling |
| Planning & Analysis | Displays AutoCAD Map 3D tools for geospatial and GIS (Geographics Information Systems) work. | Urban planners, GIS specialists |
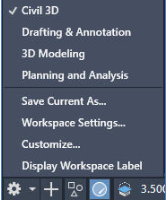
You can use these workspace as- in or modify it according to your requirements
Overview of Civil 3D Core Capabilities
- Surface Modelling
- Importing survey data (points, contours, CSV files).
- Creating and displaying a TIN surface.
- Adding break lines and editing contours.
- Alignment Design
- Creating a road or pipe alignment from a polyline.
- Applying design criteria (horizontal curves, tangents, etc.).
- Labelling and annotating alignments.
- Profiles and Profile Views
- Generating existing ground profiles from surfaces.
- Designing vertical profiles.
- Annotating grades and elevations.
- Corridors and Assemblies
- Building a corridor using assemblies (lanes, shoulders, curbs).
- Visualizing the model in 3D.
- Pipe Networks (Stormwater/Sewer)
- Creating parts lists and pipe networks.
- Connecting pipes and structures.
- Generating plan and profile views.
- Quantities and Volumes
- Calculating cut and fill volumes.
- Exporting quantity reports.
Output & Documentation
Civil 3D allows you to produce detailed and accurate documentation directly from the model:
- Generate construction drawings with labels, legends, and tables.
- Export deliverables to DWG, PDF, or BIM exchange formats.
- Use Data Shortcuts to share data between multiple drawings or team members.
Conclusion
Autodesk Civil 3D empowers engineers, surveyors, and designers to work more efficiently through a connected BIM workflow.
From survey to construction documentation, Civil 3D streamlines every stage of the civil design process — improving accuracy, collaboration, and delivery speed.

