
One of Revit’s most powerful features is its ability to support your project across all stages—from a basic concept drawing that captures the initial idea, through detailed design drawings that clarify materiality and relationships, all the way to essential technical drawings used for construction.
Each of these drawing types conveys unique information, but setting up the correct graphic standards for every single view can be incredibly time-consuming. This is where View Templates become your project superpower, offering an elegant solution to a repetitive problem.
What Are Revit View Templates?
In Revit, you have complete control over how elements are displayed in a view: which elements are hidden or visible, how they look when cut or shown in elevation, and much more.
A View Template is simply a saved collection of these user-defined display settings. Once created, you can instantly apply these settings to other views in your project. Even better, if you update the template, the changes are automatically reflected across all drawings where that template is applied, ensuring consistency and saving you countless hours of manual updates.
Maintain company drawing standards
To truly maximize efficiency, companies can embed a comprehensive set of predefined view templates directly into their company template file.
Companies can set-up predefined view templates for various drawing packages:
- Sketch Design Layouts
- Design Development Layouts
- Local Authority Submission Sets
- Technical Sets (Tender and Construction)
By front-loading this setup, you free up your team to focus on the design and technical challenges instead of manually configuring graphic display settings.
How to Create a View Template
There are three primary ways to create a View Template in Revit:
- From an existing View Template: Duplicate and modify an existing one.
- From the visibility settings of an existing view: Base a template on a view you’ve already customized. (The method we’ll detail below!)
- From the Graphic Display Options dialogue.

Step-by-Step: Creating a Template from an Existing View
This is the most common and intuitive method. Once you have a view (like a floor plan or section) with the display settings you want to standardize, follow these steps:
- Prep the View: In the Properties Browser, adjust the view’s settings (Visibility/Graphics Overrides, Scale, Detail Level, etc.) until the visual display is exactly how you want your template to look.
- Create the Template: Navigate to the ‘View’ tab on the Ribbon, find the ‘Graphics’ panel, click the drop-down arrow next to the ‘View Templates’ icon, and select ‘Create Template from current view’.
- Name It: A ‘New View Template’ dialogue will appear. Give your template a clear, descriptive name (e.g., ‘DD100_Floor_Plan’), and click OK.
- Refine the Settings: The main ‘View Templates’ dialogue box will open. Here, on the right side under ‘View Properties’, you can refine all the parameters.


Understanding the View Templates Dialogue
Key Settings to Note
- ‘Include’ Column: This column determines which parameters are controlled by the template. If a box is checked (Included), that parameter cannot be edited independently in any view the template is applied to. If a box is unchecked (Deselected), the user can edit that specific parameter (like the View Scale or Detail Level) in the individual view, potentially creating variations.
- Views Assigned To: When you select a template, this section shows you the total number of views currently using it. This is a great way to verify the template’s reach before making global changes.
Applying a View Template to a Drawing
Once created, applying the template to any view is fast and easy:
- Select the View: Open the drawing view you want to modify (or select multiple views in the Project Browser).
- Go to Properties: With the view open, look at the Properties Browser.
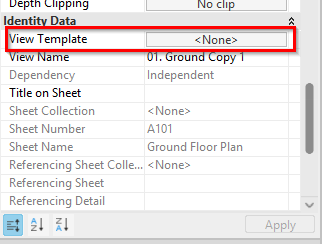
- Assign Template: Under the Identity Data category, find the View Template parameter, which will likely show <None>. Click on this.
- Select and Apply: The ‘Assign View Template’ dialogue box will open. Select your desired view template, click Apply (if you want to see the change before hitting OK), and then click OK.

The drawing view will instantly update to match your template settings. Now you’ve got full graphic consistency across your project.
In summary, by mastering Revit View Templates, you not only dramatically improve your team’s workflow efficiency but also ensure your firm’s drawing standards are perfectly consistent across all projects.

