

In previous versions of Revit, keeping views (plans, sections, elevations, or legends) aligned across multiple sheets was quite time-consuming. You either had to set up a Guide Grid and carefully position each drawing, or rely on the “eyeball method.” Both worked, but neither was accurate nor fast.
With Revit 2026, Autodesk has added a much more powerful option under Positioning & View: you can now Save, Edit, and Manage View Positions.
What’s New
Once a view is placed on a sheet, you can save its position, give it a name, and then apply that same position to other views across multiple sheets. This means you can standardize layouts much faster, without having to nudge things around manually. The image below shows the additional functions under Positioning & View.

How It Works
Once a view is placed on a sheet, Revit 2026 now lets you save its exact location. You can then name this position and apply it to other views, ensuring perfect alignment across multiple sheets.
The process is straightforward:
- Place a view onto a sheet and position it exactly where you want it.
- Save the position and give it a name.
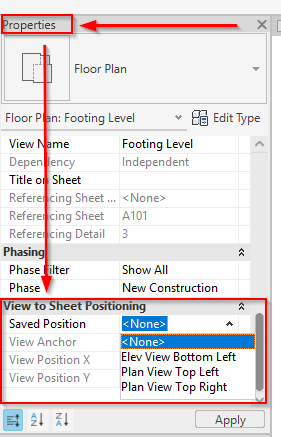
- In the Properties Browser, scroll down to the ‘Saved Position’ parameter and apply the named position you just created.
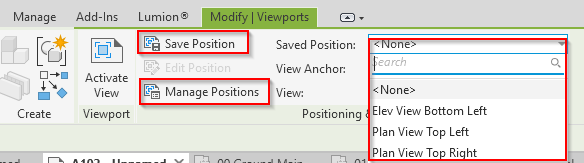
When you place these views on their respective sheets, they will automatically snap to the saved position.
Applying Saved Positions
After saving a view position:
- Open the Properties Browser.
- Scroll down to find Saved Position.
- Apply the saved setting to other views.
When you place those views on sheets, they’ll automatically snap to the correct position. The image below shows the drop-down list with the saved views.
To get the most out of this feature, two elements are critical: the Crop View and the View Anchor.
- Consistent Crop Views: For views to align perfectly, their crop regions must have the same position and dimensions. If your crop region sizes differ between views, their alignment on the sheets will be slightly off, depending on the View Anchor setting.
- Pro Tip: To ensure crop boundaries are identical across multiple plan views, define the crop boundary in one view, copy it to the clipboard, and then use ‘Paste > Aligned to Current View‘ in the other plan views.
- Views Without Crop Regions: It’s important to note that if a view does not have an active crop region, the View Anchor will automatically default to the ‘View Origin’ until a crop region is applied.
Applying Saved Positions
After saving a view position:
- Open the Properties Browser.
- Scroll down to find Saved Position.
- Apply the saved setting to other views.
When you place those views on sheets, they’ll automatically snap to the correct position. The image below shows the drop-down list with the saved views.
Managing Saved Positions
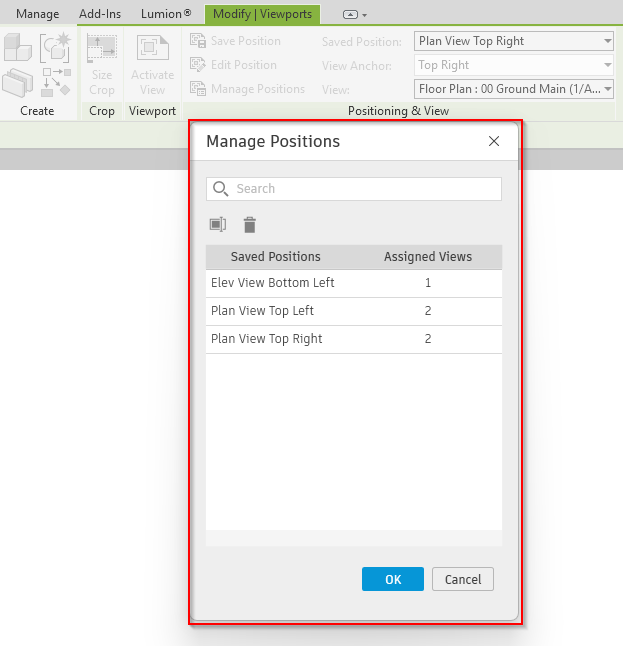
The Manage Positions feature shows all your saved positions and shows a count of how many views it has been assigned to. This makes it easy to keep track and update them if needed. The image below shows the Manage Positions dialogue box.
Why It Matters
Although this update has room for improvement, it’s a big step forward. It significantly improves documentation workflows, reduces repetitive adjustments, and gives you more consistency across your project sheets.
If you’ve ever wasted time re-aligning views, this feature will save you a lot of time and effort.

